Wednesday, June 23, 2010

If two clowns got married last minute.....


THIS might be the cake at the reception! I had a request to do a cake for a friend's daughter's 10th birthday. She didn't really care what the design was, as she was more interested in just EATING the thing! How can you argue with that? So I decided to try my hand at the Whimsical Bakehouse signature topsy-turvy cake, only without the topsy-turvy business. Yes, I know, it does still look like it's leaning, but I think in reality it was quite straight. I was just taking a picture for posterity's sake and not going for a shot that showcased the final product.

I had 2 things going against me on this one: I didn't have the tips on hand that the design required, which honestly I thought I could fudge my way through anyway, but even more so, I didn't have a good plan as far as the color scheme went. I should know by now to always have a plan! The cakes I've been most pleased with so far have had a nice color drawing to go off of, a rudimentary sketch I can play with the dimensions and colors on. So the end result was not what I wanted. But I'm posting it anyway, as anyone who does cakes knows: You only get better by getting more experience under your belt!

Monday, June 14, 2010


Well, not perfectly quiet, but pretty quiet-as I've only done 2 cakes in the past month. To be honest, I kind of needed the break! And the 2 cakes I did? One exceeded my expectations, turning out pretty darn close to my original drawing, and despite the fact that I had to bake & decorate it away from home (which is really awkward in the best of circumstances! I love the comfort of my own kitchen, knowing where everything is & whatnot. Seriously, I forgot to pack like 10% of the stuff I needed-including my camera.)

The event was my sister's baby shower, and she gave me artistic license (WOO HOO!) so I decided to get some more chocolate design experience under my belt. Using basic baby item shapes, I created bottles, pacifiers, ducks, and rattles that were placed around the cake. Oh, and safety pins, but they were very thin & fragile, and not many survived the 2 hour car trip, so I only placed one on the top of the cake. The polka-dots and letters are made from chocolate as well. The blocks were pretty challenging. I had meant to scout around for some square cupcake pans, but had to settle for some mini loaf pans because there just aren't enough hours in the day. The downside to this was I had to cut them to shape, and layer a bit to get squares, and that always results in a lot of crumbs to have to coat over. One of the crucial items I forgot were the supplies to support the cake; had I been at home, i would have had better support going on for those blocks at the top. They're a bit on the tipsy side. The letters SMD are the baby's initials.


Then there's this cake. Oh, I hate this cake! Not so much how it turned out, but the process was nightmare! In addition to the chocolate buildings (using an idea found in the Whimsical Bakehouse book), there was a cool bridge, formed in a curved shape to fit the cake, and a Statue of Liberty. Yeah. After hours & hours of work, the bridge broke (ARGH!) and the Statue of Liberty looked more like the Jolly Green Giant, which I thought would really just confuse people. A little back story on this cake: My sister in law works with woman who lives 3 houses down from me. This woman has been in the long, arduous process of adopting her son for a little over 2 years. The process was finally completed in May, so they wanted to throw a big party to celebrate. My sister in law offered to provide the cake (enlisting me). It wasn't until maybe 10 days prior I was given a final, approximate, head count: 65-70 people!!! Yikes. Way, way, bigger than what I am used to making, by double or more. So this picture does not really portray how large this bugger was. The bottom layers were 14" rounds, the middle was 9" and the top was 6". I think I used something like 6 boxes of cake, and I don't even want to think of how much frosting. The biggest problem with a cake this size was once I assembled it, the scads & scads of buildings and taxi cabs I had crafted out of chocolate just barely gave the impression of a city, when I wanted something hustling & bustling. I'm also still trying to figure out how to best tint the Whimsical Bakehouse
frosting that is my current favorite. The author uses candy coloring, but I can't seem to get her intensity with the Wilton candy colors. The amount of coloring needed to achieve that red was a little disturbing too. In the end, it was acceptable, it's just that it was completely overwhelming, and I probably should have timed things a little better.

Next two cakes on the table: Umizoomi cake request for my friend's 3 year old son the first weekend of July, and a Lego cake for my nephew in the following weeks.

Thursday, May 13, 2010

Baking: Not for the faint of heart

Because let me tell you, my normal "type A" self just about has a heart attack every time I'm in the middle of a baking project:

(Warning: may cause convulsions in those who like neatness & order in their lives)

Pretty scary, huh? I always feel like if anyone saw my kitchen in the middle of a project, they'd RUN! RUN AWAY AND NEVER LOOK BACK! KEEP THE BAKED GOODS, LADY!!!!! The thing is: I HATE a messy kitchen! And I do actually clean up as I go (I swear!) but for this project, I had 55 cupcakes to bake, fill, frost, and embellish. The request was for any old simple cupcake, but they specifically wanted them to be numbered 1-55, in honor of the birthday girl's 55th birthday.

Of course I couldn't just go the simple route. That would be waaaaay too easy. Nope. I had grand plans for 6-7 different varieties, but ended up with 4:

1) White cupcake with fresh strawberry cream cheese filling & strawberry flavored buttercream
2) White cupcake with mini chocolate chip/cream cheese filling baked in, chocolate buttercream
3) Chocolate cupcake with cream filling a la Hostess style, with regular buttercream
4) Chocolate Frappuccino cupcake with a Frap cream cheese filling & hint of Frap in buttercream

Sooooo, I had like 850 bowls, 10 tons of powdered sugar, both the Kitchenaid stand mixer and hand mixer in use, food processor for the strawberries, and approximately half a million other ingredients littered about the kitchen. It was touch and go for a while there. My heart palpitates a bit just reliving it through the photo.

In the midst of chaos, I did discover a funny thing...but first a quick foreword. I love to bake cakes from scratch, but have found that more often than not, they simply are not as moist as boxed mixes. I've experimented with applesauce, mayonnaise, coconut milk, you name it. If I'm just putzing around making something for the family, I still try homemade recipes, but for actual orders, I'm sticking with the sure thing until I find the magical homemade recipe that lives up to the moistness of mixes. So there. My secret is out. Anywho, I made one batch of dark chocolate as the package instructed, and for the other, I used bottled Starbuck's Frappuccino in lieu of water. It might be hard to tell from the photo, but the ones made with Frappuccino baked up higher, rounder, and moister than the ones using water (Frap version is the one on the right):


Weird, huh? I detected just a hint of the Frap taste, and others might not have even noticed if not informed of the switch, but I'm convinced it made for a better overall cupcake.

On the flip side, I discovered that mixing fruit puree with traditional Wilton buttercream is NOT a good idea! The result was something that tasted fine but resembled congealed strawberry barf. Sooooooo not good!

I used the good old chocolate melting wafers method to form the numbers, and here's the overall result:

Tuesday, May 4, 2010

My current cake obsession

For quite a while I searched & searched for a frosting recipe that would be light, airy, and yet still delicious, flavorful, and easy to work with. I wish I could tell you I was one of those kitchen magicians who could throw together a pinch of this, a dash of that and Voila! But alas, I am not. I am pretty darn good at googling, however! You would think with the billions of things one can find on the internet, this would be an easy task. Not so! For months I searched with no luck, but then I noticed the more forums I went to, a certain name kept popping up: Whimsical Bakehouse.
Intrigued, I began seeking out websites, examples, reviews, you name it. Upon seeing some stunning examples of cakes made using techniques found in this book, I decided it was worth the purchase. Words cannot describe how glad I am that I found this book! Seriously, I've been known to take this book to bed with me in lieu of a good fiction novel!

The book is packed with some great cake recipes, but what I absolutely am loving are the filling recipes, the chocolate transfer method, and most of all, a recipe for buttercream that whips up light & creamy, similar to good bakery frosting, but a little lower key on the sugar front (don't get me wrong, frosting is supposed to be sweet & all, but I like to be able to eat it all without getting a sugar buzz! Nothing sadder than having to throw out that last bit of frosting because it's just. too. sweet!) .

And here's a funny thing: Men love it. I don't know why, but I can't tell you how many times now I've gotten compliments along the lines of: "My (husband, boyfriend, fiance) usually doesn't like frosting, but when they tasted this, they said it was the BEST CAKE THEY'D EVER EATEN." Hmmm. I dunno what it is, but maybe the sweetness being toned down appeals to them more? Never fear though, the women and children have responded just as well! I overheard this comment last weekend, made by a woman who had no idea who I was or that I had made the cake she was eating: "I usually don't like frosting, but this is really good!" Score!

It's a little tedious to make (20 minutes in the mixer!) but it's so worth it. One thing to beware of: If you're used to stiffer frosting, such as the classic Wilton recipe, it is a little alarming to work with a frosting that does not harden! A little bump on the old stuff and no worries. Nudge this frosting at all, and plan on reworking that area of the cake!

The cookies & cream filling is good enough to eat with a spoon. I had to physically dump out the leftovers last time because I kept sneaking over to the bowl and swiping little bits here and there, which is fine, but had I eaten the whole 2 cups or so remaining....yikes.

Delicious frosting and filling aside, the book spends a good length of time detailing the chocolate transfer method. The concept is simple: Place any image on the counter. Cover it with parchment paper (I prefer wax) and basically outline, then color it in-using colored chocolate.

This cake was my attempt at one found in the book:

The author's looked more like a piece of artwork than stained glass, but working with this medium takes a little bit of practice.

So when my daughter declared she wanted a Finding Nemo birthday cake, I used this technique to create the characters:
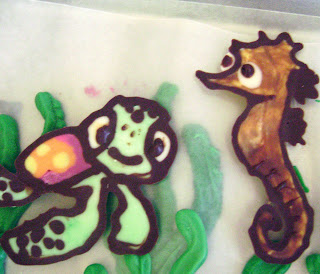
The whole cast:
And the finished product:

Since the chocolate can be done up to 2 weeks in advance, a TON of stress is taken off of the cake preparation the day prior/day of. All that was left to do was fill, frost, and attach the cast! The truly beautiful thing with this method is: You can customize it any way you like! This last cake was done using the invite, so the cake tied in nicely with all of the party decorations.

Friday, April 30, 2010

Cakes, cakes & more cakes

Everywhere, cakes! It was a mere 6 months ago that I was asked by someone outside of the family if I would do a cake for a birthday party. Me? Really? You see, for the longest time I thought the cake-decorating gene simply skipped over me. It would take 2 hands, a foot, and maybe a couple toes to count the women in my family who have this particular talent. Not only that, but women who marry into the family have been known to have the skill as well. But me? My first cake, so carefully planned out for my daughter's first birthday almost 6 years ago was, to put it kindly, a complete disaster. I cried, and the next year saved myself the grief by ordering an ice cream cake. Year 3 came around, and I gingerly stuck my toes back in, and with the help of my brother, was able to produce something reasonably cute and definitely tasty. By the time her 4th birthday came around, I felt confident enough to attempt a cake all by myself, after spotting a fairly easy Candyland design in a Tastefully Simple magazine. I figured, how hard could it be to make a sheet cake and cover it with candy?


The ease with which I was able to make this cake gave me the confidence I needed to venture forth for birthdays #5 and 6, plus birthdays #1 and 2 for her little sister.

Then, last November, after having attended a couple birthday parties at our house, our neighbor asked if I would make a dinosaur cake for their son. Talk about nerve-wracking!!!! I mean, it's one thing to make a cake for your own child, but the thought of making one that people I didn't know were going to see was soooooo anxiety inducing.

After some research on my favorite photo site-Flickr, I settled on a design that i could do using buttercream (you'll find I am very anti-fondant. I have issues. lol)

This is not my original design, but it gave me a good chance to work with shaped cakes, and different mediums, mainly melting chocolate (for the scales and dots). I also was able to experiment with using rice-krispie treat for the trickier shapes (head and tail).

It seems once that cake hit the table, things just took off from there! I've done close to 10 cakes this year in my spare time, with 5 of those being in the past 5 weeks. Phew! Managing that around a full time job, 2 young children, a house, a husband, 2 cats and a rabbit is not easy! But at the end of the day, I simply love this hobby. I'm also grateful that the seemingly dormant gene has decided to come to the forefront, and I look forward to growing in this arena, and one day maybe my dream of owning my own bakery will be a reality!


Winter themed cake made with rice-krispie snowman (probably wouldn't go that route again!) and frosted sugar cookies.

Another borrowed idea that I expanded on to accommodate a larger party.
Simple cake made for a friend whose birthday falls right before Valentine's Day.